Time Clock
The Time Clock is a live, networked time-in-attendance recording system that enables your staff to record when they arrive and leave the workplace and when they start or stop any given task. Working in harmony with the Payroll, Manufacturing and Job costing modules, the Time Clock can be interfaced to a range of barcode, biometric or radio-frequency identification (RFID) peripherals to produce a robust, efficient yet simple to use time-in-attendance recording system.
Features
- Records when staff arrive and leave the workplace
- Records when staff begin and stop a job or work order
- Records when staff begin or stop each step of a work order route
- Displays what each employee is currently working on
- Displays a daily history of the employee’s work
- Automatically calculates penalty rates based on employee hours schedules
- Elegant, modern design and easy to use by all staff
- Can be run on panel-PCs, touch screens or kiosks
- Interfaces to bar code readers, RFID tags or biometric (fingerprint, palm, eye) scanners
- Seamless integration with the Manufacturing, Payroll and Job costing subsystems
Benefits
- Eliminate the need for all staff to manually fill out timesheets
- Eliminate the need to re-enter timesheets into the payroll system
- Eliminate the need to manually calculate overtime hours and rates
- Report and analyse machine usage, employee attendance and efficiency & idle time
- Accurately record work order and job costing to the minute
- See in real-time who is working on which jobs
- See in real-time which machines are being utilised
Specifications
The Time Clock is a part of the Accentis Enterprise business management software system. It must be run within a Windows-based operating system on a PC conforming to the Accentis Enterprise system specifications.
The Time Clock identifies the user making the time clock entry by interfacing to any device that produces an employee identification code via a physical or virtual COM port. This can include, but is not limited to, a:
- Bar code reader
- RFID tag reader
- Palm print scanner
- Thumb or fingerprint scanner
- Retina scanner
The Time Clock identifies a job, work order or work order route using a barcode scanner and a bar code printed on a work sheet or label according to the Accentis Enterprise Bar Code specification. Any other method of data collection may be used providing that the Bar Code numeric protocol is preserved.
The Time Clock records events that are initiated by an employee. It can record the time, down to the nearest multiple of minutes (specified within the program) at which an employee:
- Arrived at a workplace
- Began working on a job or a work order
- Began working on a job’s cost centre or a work order’s route
- Stopped working on a job or work order
- Left the workplace (either at the end of the day or for a lunch break)
The information recorded by the Time Clock includes:
- The payroll Pay Item that should be used for each time event
- The employee’s rate of pay that should be used
- The employee’s job costing rate that should be used
The Time Clock can display the following information:
- A list of employees showing the current job or work order on which the employee is working
- A history of Time Clock events for an employee
Accentis Enterprise reporting tools allow you to analyse and report the results of the Time Clock data to show:
- Total hours spent on a job or work order and at what rate
- An employee’s throughput and efficiency
- A work centre’s utilisation
- Person-hours achieved per day
- Slack time between jobs and work orders
Direct integration with the Payroll system allows for a seamless flow of information to the next pay run and eliminates the need for timesheet data entry.
Time Clock overview
Time Clock has been designed to replace the traditional manual bundy clock in use in many workplaces. Employees can Clock ON when they arrive at work and Clock OFF when they finish for the day. The functionality within Time Clock goes far beyond these basic functions however.
Throughout the day, employees may work on one or more Jobs or Work orders. Time Clock allows the start and stop times for these activities to be recorded as timesheet entries which can then be transferred directly into the Payroll system. This functionality provides tremendous savings in time and overheads and also offers improved accountability and tracking of work time and costs.
To ensure accurate entry of information, Time Clock is barcode driven and automatically applies times to activities. This cuts down on user entry errors and ensures that the times recorded for employee activities represent when the employee actually performed the activity.
Starting Time Clock
Time Clock can be started from the Job Costing > Time Clock menu item on the main Accentis Enterprise form.
You can also start Accentis Enterprise in Time Clock mode via a command line parameter of -TCLogin. For best use of this approach, a user should be created with only Time Clock permissions and no password. Including this switch on the command line will cause Accentis Enterprise to try and log in automatically using the last user name and no password. When Accentis Enterprise starts, it will show the Time Clock form and hide the main form. Closing the Time Clock form in this mode will cause the user to log out of Accentis Enterprise.
Time Clock is subject to standard user permissions. As such, any user trying to open Time Clock will require read permissions on the Time Clock function to open the form and add / edit permissions on the same function to perform any Time Clock functionality.
Closing Time Clock
The Time Clock can be closed using the black X in the top right corner of the form.
Closing Time Clock form does NOT affect the status of any employees.
Moving Time Clock
As menus and title bars have been removed from the form for simplicity, you can no longer click on the title bar and drag to move the Time Clock form around the screen. Instead, hold the Ctrl key down and click anywhere on the thin black border around the form. You can then drag the form around as normal.
Time Clock barcodes
Barcodes used within Time Clock must conform to the specifications supplied by Accentis. There are up to six separate types of barcodes that can be used with the system as follows
Used to identify which user is completing an action. Each employee MUST have an ID barcode in order to use Time Clock.
Used to tell Time Clock that the employee is Clocking ON or OFF for the day. This barcode is not essential as the functionality can be performed within Time Clock after swiping an ID barcode.
Used to tell Time Clock that they are beginning work on that particular Work order. Each work order that an employee works on MUST have a barcode associated with it.
Used tell Time Clock that an employee is beginning work on a particular route of a Work order. This barcode is not essential as the functionality can be performed within the Time Clock after swiping a Work order barcode.
Used to tell Time Clock that an employee is beginning work on a particular Job. Each job that an employee works on MUST have a barcode associated with it.
Used tell Time Clock that an employee is beginning work on a particular route of a Job cost centre. This barcode is not essential as the functionality can be performed within the Time Clock after swiping a Job barcode.
Time Clock modes
Time Clock incorporates three main modes. employee list mode, daily view mode and Time Clock mode
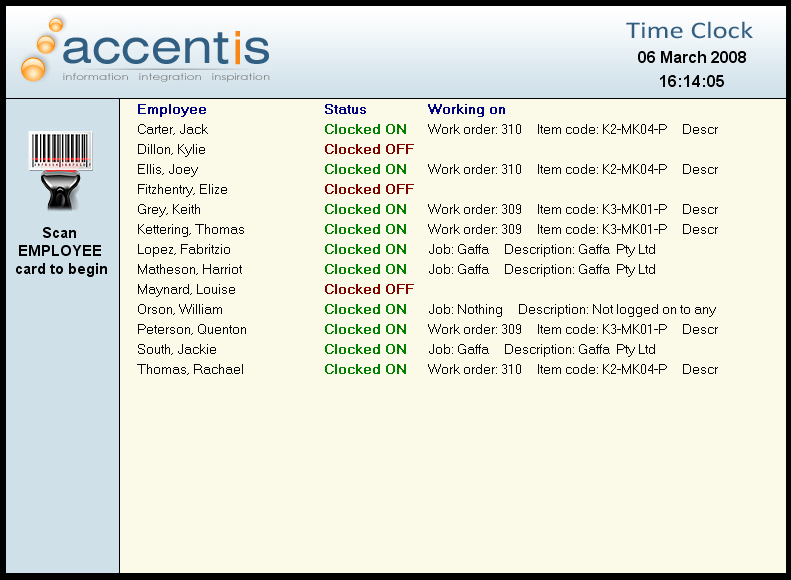
When you first open Time Clock, you will be presented with the employee list mode. This mode simply shows a list of all employees, their status (Clocked ON or OFF) and what they are currently working on. It provides an easy way to see an overview of the status of all staff at a glance. The options available in this view are either double clicking an employee in the list or scanning an employee barcode.
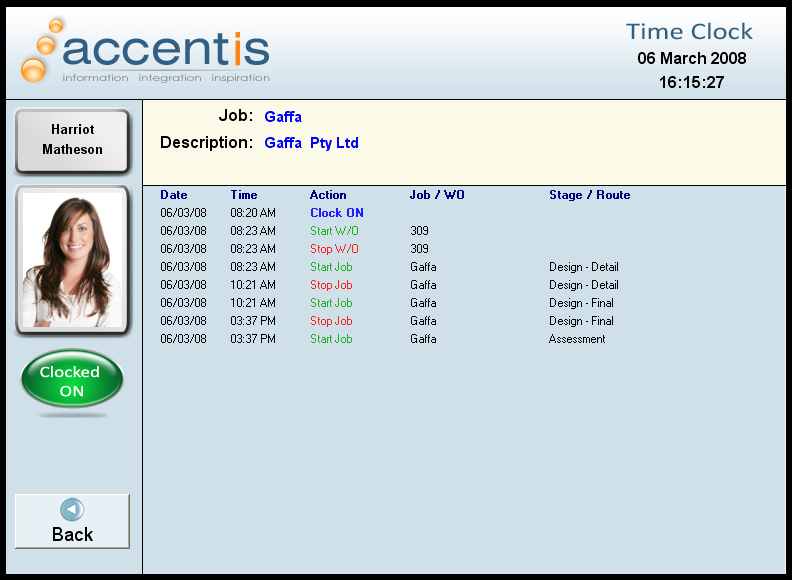
The daily view mode displays the details for an employee down the left hand side, what the employee is currently working on at the top and a list of the employee’s activities for the entire day at the bottom. This mode allows you to see a detailed list of what the employee has been working on for the entire day. The options available in this mode are clicking the back button to return to the employee list mode or scanning an employee barcode.
Time Clock mode is the heart of Time Clock and is the mode in which all actions are completed. This mode displays the details of an employee down the left hand side, what the employee is currently working on at the top and presents employees with available options depending on their current status at the bottom. In this mode, employees can Clock ON or OFF, start or stop working on a Job or Work order, view their activity for the day or return to the employee list mode.
Using the Time Clock
Ease of use has been a major consideration when designing Time Clock. As the system can be used in any number of operating environments, and by a wide range of employees, the Time Clock form has been designed to be as user friendly as possible.
Time Clock is primarily barcode driven. This means that the majority of functionality can be performed by scanning various barcodes, and as such, a barcode scanner is essential hardware. Employees will not be able to record their activities without one.
Each employee requires a unique Employee ID barcode, which can be either carried with them or left close to an Time Clock terminal. This ID barcode is used to tell Time Clock which employee is performing an activity and should be the first barcode the employee swipes when they are entering the activity.
While Time Clock can be completely driven via barcodes, a lot of the functionality can also be performed via standard windows methods such as clicking. This is not always easy, or convenient for employees though, so Time Clock has been designed to function seamlessly on touch screens.
- Double clicking on any employee while in employee list mode will display the daily view mode for that employee.
- Holding CTRL while double clicking an employee in employee list mode will switch modes and display the Time Clock mode.
- Scanning an employee ID barcode while in employee list mode will switch modes and display the Time Clock mode.
When you open Time Clock, you will be presented with the employee list mode. This is the basic mode in which Time Clock remains when not in use by an employee.
While in employee list mode Time Clock expects to have an employee in the list double clicked or to receive either an employee ID barcode or an employee Clock ON / Clock OFF barcode.
- Double clicking on any employee in the list will display the daily view mode for that employee.
- Holding CTRL while double clicking an employee in the list will switch modes and display the Time Clock mode.
- Scanning an employee ID barcode in this mode will switch modes and display the Time Clock mode.
The effect of scanning an employee Clock ON / OFF barcode when in employee list mode will depend on the status of the employee scanning the barcode. If the employee is currently Clocked OFF, they will be automatically Clocked ON and their status in the list will be updated. If the employee is already Clocked ON, anything they are working on will be stopped and they will be Clocked OFF. Again, their status in the list will be updated to reflect this.
Scanning any other type of Time Clock barcode will cause a warning to be displayed in Red at the top of the form indicating that the current employee is not known and that an employee ID barcode should be scanned before continuing.
Switching to the daily view mode will cause the layout of the form to change.
The left hand panel now displays the name and picture of the selected employee, followed by their current status (Clocked ON or Clocked OFF) and finally, a Back button. Clicking on the Back button will simply return you to the employee list mode.
The top panel on the right hand side now displays what the current employee is working on. If they are Clocked OFF, this panel will be empty, otherwise it will contain the name and description of the Job or Work order they are working on. If the employee is not currently working on a Job or Work order, the name of the employee Idle time job will be displayed.
The bottom panel on the right hand side displays the full day’s activity for the current employee. These entries are listed in the order they happened, form first to last down the screen and include when the employee Clocked ON, when they started and stopped working on particular Work orders or Jobs and when they Clocked OFF.
This mode is designed to simply give a picture of the daily activities of an employee and as such, activities or times can not be modified in this mode.
Even though this mode does not allow changes to be made to data, both the Employee ID barcode and the Employee Clock ON / OFF barcodes will still function exactly as they do in the employee list mode.
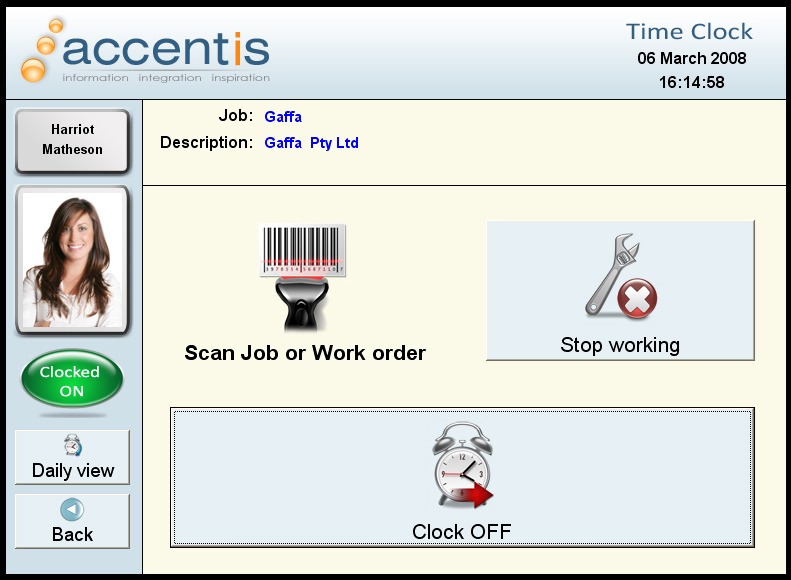
Switching to the Time Clock mode again causes the layout of the form to change. Some parts of the layout in this mode are very similar or the same as the daily view mode.
The left hand panel displays the name and picture of the selected employee, followed by their current status (Clocked ON or Clocked OFF). In Time Clock mode, a Daily view button becomes available along with the Back button.
The Daily view button switches modes to the daily view mode for the current employee. When entering the daily view mode via this method, the Daily view button remains available and clicking on either the Daily View or Back buttons will return you to the Time Clock mode for the current employee.
Clicking on the Back button in Time Clock mode will return the employee to the employee list mode.
As with the daily view mode, the top panel on the right hand side now displays what the current employee is working on. If the employee is Clocked OFF, this panel will be empty, otherwise it will contain the name and description of the Job or Work order they are working on. If the employee is not currently working on a Job or Work order, the name of the employee Idle time job will be displayed.
The bottom panel on the right hand side provides the employee with a set of options depending on their current status.
If the employee is currently Clocked OFF, the only available option will be to Clock ON. In most cases, the first thing an employee will do when they arrive at work is swipe their Employee ID card and click the Clock ON button before heading to their work area. With this in mind, clicking the Clock ON button will change the mode back to the employee list mode so that the next employee to arrive can repeat the process. If the employee swipes their Clock ON / OFF card at this stage however, they will be Clocked ON, but the form will stay in Time Clock mode ready for the employee to perform the next action.
Scanning a work order or Job barcode while the employee is Clocked OFF will cause a warning to be displayed in Red at the top of the form indicating that the current employee must Clock ON before continuing.
Once an employee is Clocked ON, the Clock ON button changes to say Clock OFF. Clicking on this button or swiping the employee’s Clock ON / OFF barcode will cause anything the employee is working on to be stopped and the employee to be clocked OFF. The form will then return to the employee list mode.
After clocking ON, the employee is shown a prompt at the top left of the panel indicating that they should scan a Job or Work order barcode.
At this stage, scanning a Job or Work order barcode (or a Job cost centre or Work order route barcode) will cause one of two effects. If the employee is not currently working on anything, they will start working on that job or work order. If the employee is already working on a Job or Work order, that Job or Work order will be stopped and the scanned Job or Work order will be started.
As Jobs are treated differently to Job cost centres within Time Clock (and the same goes for Work orders and Work order Routes), scanning a Job barcode will sometimes have a different effect to scanning a job cost centre barcode.
If the barcode of a job that does not have any associated Job cost centres is scanned, the employee will start work on that job and be returned to the employee list mode. The same occurs when a Job cost centre barcode is scanned, except that the employee will start work on the Job cost centre.
If the barcode of a Job that has associated Job cost centres is scanned, a list of all associated Job cost centres is displayed in a list with a prompt asking the employee to select the cost centre they wish to work on. The first entry in this list provides the employee with the option to work on no Job cost centre, instead working directly on the Job. Selecting a Job cost centre to work on is achieved by simply clicking on the desired cost centre in the list. Doing so will start the employee working on the Job cost centre and return the Time clock to the employee list mode.
Once working on a Job or work order, a stop button also becomes available. Clicking on this button will stop the current activity (Job or Work order) for the employee and the button will disappear.
Behind the scenes
While the user interface of the Time Clock provides a simple way for employees to tell Accentis what they are doing, behind the scenes is where the work takes place.
Every action that a user performs via the Time Clock is logged in 2 separate ways. These actions are logged as Timesheet entries and Audit trail entries.
When an employee either Clocks ON or OFF or starts or stops working on a Job or Work order, a timesheet entry is added to Accentis Enterprise.
Last edit 08/11/19