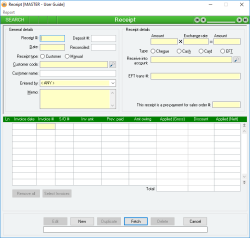
Receipt
A Receipt allows you to record the receipt of payment by a Debtor and optionally allocate the payment to one or more Sales invoice. A Receipt is used whenever monies are received into your enterprise, not only by Debtors (Customers) but also bank interest, dividends or refunds.
A Receipt does not have to be allocated to any Sales Invoices, and it does not have to refer to a specific Debtor – for example, it can be an Interest Income account to which the amount is being allocated.
A Receipt can be in the form of Cash, Cheque or Direct Deposit. Any Receipts of Cash or Cheque must be deposited using the Deposit form, although you may flag them as a direct deposit into a cash on hand account if you intend using the cash directly. You can’t delete a Receipt if it has been deposited.
You cannot specify a Sales invoice more than once on a single Receipt, however a Sales invoice can appear on multiple Receipts. A Receipt is the only method by which you can pay amounts off a Sales invoice or flag a Sales invoice as having been paid.
A Receipt line allows you to enter zero or more Sales invoice numbers and allocate an amount from the receipt to each. The Amount received for a Sales invoice can only be updated by including the invoice in one or more Receipts and allocating an amount to it.
You don’t have to have any Sales Invoices for a Receipt, but you can only enter them if you have selected a Customer code for the Receipt.
A Receipt is referenced throughout the system by its Receipt # .
- If you have not allocated all of the amount received to Sales Invoices, then you will be warned of this and asked if you want to continue. If you select Yes, an over-allocation credit invoice will be created which can be taken up on a future receipt. If you select No, then you will be returned to Edit mode and no further action will take place.
- If you have allocated a larger amount to a Sales invoice than is owed for that invoice, you will be warned of this and asked if you want to continue. If you select Yes, an over-allocation credit invoice will be created which can be taken up on a future receipt. If you select No, then you will be returned to Edit mode and no further action will take place.
- A single Journal transaction is created that Debits the Receive into account and Credits the Customer account by the total amount of the receipt. For example, this would usually increase the money in the bank (or decrease your overdraft) and decrease the customer’s debt.
- Any Sales invoice that exists in the Receipt lines is updated to reflect the amount that has been allocated to it.
- If a receipt has a linked Sales order, that order's Warehouse will be used as the warehouse for any over-allocation invoices. If the receipt does not have a linked Sales order, it will use the system preference for Default sales order warehouse .
Module: Accounts receivable
Category: Receipt
Activation: Main > Accounts receivable > Receipt
Form style: Multiple instance, WYSIWYS, SODA
Special actions available for users with Administrator permissions:
- Settlement discount amounts can be modified
Database rules:
- A Receipt cannot be given a date that is outside the range of the Extended financial year
- A Receipt cannot be deleted if its date is outside the range of the Extended financial year or before the Journal lock date
- A Receipt cannot be deleted if it is referenced by any of the following:
- Duplicate button is disabled for POS Receipts
- When duplicating, the following fields are cleared: Deposit # , Reconciled , Over-allocation values , rebate details
Reference: Number, Read-only, WYSIWYS
This number uniquely identifies a Receipt. The Receipt # is automatically generated by the system after the first update of the receipt and cannot be changed for the life of the receipt.
If a Receipt is deleted, its Receipt # will never be used again for another Receipt.
Reference: Date, Mandatory, QuickList, WYSIWYS
This is the date on which the Receipt occurred (or on which it was deemed to have occurred). It can be any valid date that is within the current extended Financial year providing the date is not before the Journal lock date.
Reference: Text(12), AutoComplete, QuickList, WYSIWYS
This is the Customer code that represents the Customer (Debtor) from whom the amount has been received. This field is an auto-complete field and must contain a valid Customer code or be empty before you can update the receipt. To display a list of all valid Customer Codes, click on the button or press the QuickList Hot Key.
It is not essential that you enter a customer code: this is just a convenient way to specify the account that should be credited with the receipt amount. If you don’t select a Customer code, you must manually enter the account code that is to be credited in the Customer account field. If you are performing a receipt of interest from a bank account, for example, you would leave the Customer code empty and enter the Interest Income account into the Customer account field instead.
If you have selected a Customer code for this receipt, you will not be able to change the Customer account.
Reference: Text
This is the name of the Customer that's linked to the Customer code and will be automatically filled upon entry of the Customer code. When searching for a record, you can search by the Customer name field. The search results can be ordered by this field if it is selected when the Fetch button is pressed.
Last edit 01/10/19
Reference: Account, Mandatory, QuickList, WYSIWYS
If “Manual” is selected as the Receipt Type, this "Allocation account" field will display. This is the Account code that represents the account that should be credited with the receipt amount. A valid account code must be selected in this field.
If “Customer” is selected as the Receipt Type, the Allocation account field will not display. Instead, the account to be credited will be the General ledger account for the chosen customer. This account number is not displayed in the receipt form, but can be located and confirmed within the Account tab of the Customers form.
Last edit: 23/03/21
Reference: Select from list, Mandatory, HotEdit, WYSIWYS
This is the User ID of the user who created the Receipt. This is automatically filled with the User Id of the current user and cannot be changed unless the user has Administrator permissions for Receipts.
Reference: Memo, Expandable, WYSIWYS
This allows you to enter any specific comments about the Receipt.
Reference: Currency, Mandatory, WYSIWYS
This is the total amount that was received for this Receipt. The Received amount should always be specified in terms of the currency displayed next to it. This Currency is determined by the currency of the Customer Account code .
You will not be able to edit this amount if the Receipt has been deposited.
This is the exchange rate given at the time the Receipt was completed.
This field will only be visible if the currency for the Customer account differs from the currency of the Receive into account.
When an exchange rate is entered, both it and the Amount are used to calculate the corresponding amount for the second currency.
The way in which the receipted amount has been remitted must be one of the following:
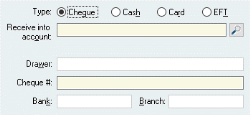
- Cheque: This specifies that the Customer paid using a cheque. If this type is chosen, the Drawer , Cheque # , Bank and Branch fields will appear and must all be filled in. The Receive into account… will be automatically filled in with the account specified as the default receipt account in the Accounts receivable database setup
- Cash: This specifies that the customer paid by cash. If selected, the Name of the person who paid the amount should be entered. The Receive into account will be automatically filled in with the account specified as the default receipt account in the Accounts receivable database setup
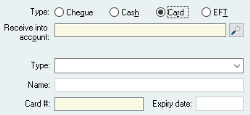
- Card: This specifies that the customer paid by credit card. If selected, the Type , Name , Card # and Expiry date must be filled in. The Receive into account will be automatically filled in with the account specified as the default deposit account in the Accounts receivable database setup
- EFT: This specifies that the customer directly deposited the funds into your bank account. If selected, the name of the depositor should be entered. The Receive into account will be automatically filled in with the account specified as the default deposit account in the Accounts receivable database setup
The default receipt type: For a customer without any previous receipts, the default type used on the Receipt form is EFT (after version 6.18.146). If the customer has had previous receipts, the type used for a new receipt will default to the type used on the most recent receipt (latest receipt number, not necessarily the most recent receipt date).
Reference: Account, Mandatory, QuickList, WYSIWYS
This is the Account code that represents the account that should be debited with the receipt amount. This will generally be a cash-on-hand asset account for amounts that are yet to be deposited, but maybe a direct bank or overdraft account.
Reference: Select from list, Text(64)
This is the type of credit card being used for the receipt. You can select a pre-defined type from the list or enter the name manually. There is no restriction on the type you enter into this field.
Reference: Text(5)
This is the expiry date, as stated on the card.
Reference: Text(64)
Information is under review for a new version and will be updated soon.
Reference: Number, QuickList, WYSIWYS
This is the Sales Invoice # for this line. You cannot update a Receipt that contains duplicated Sales invoice numbers in its lines. You won’t be able to enter a number in this field until you have selected a Customer code for the Receipt. Any Sales invoice number you enter in this field must be a valid Sales invoice for the customer you have selected.
After you have typed in a Sales invoice number in this field, the other columns of the Receipt line will be automatically filled in with the appropriate values for that invoice, providing the invoice number is valid AND it relates to the selected customer. If not, the words INVALID INVOICE NUMBER will appear on the Receipt line.
You can select Sales Invoices by either using the QuickList Hot Key or by clicking on the Select Invoices button. You are able to select multiple invoices at a time using this method.
A Receipt line is deleted by deleting its Invoice number.
This is the Sales Order # that relates to the selected Sales invoice.
Reference: Currency, Read-only
This is the Total amount of the selected Sales invoice.
Reference: Currency, Read-only
This is the total amount that has already been paid off the selected Sales invoice. If you are viewing the Receipt form in Idle mode this amount will include the amount of this Receipt, however if you are in Add or Edit mode this amount does not include the amount of the current Receipt.
Reference: Currency
This is the total amount being received for this Sales invoice. It does not include Settlement discount values .
Reference: Currency
Information is under review for a new version and will be updated soon.
Reference: Currency, Read-only
This is the net amount being received for this Sales invoice, taking into account any Settlement discount values that has been applied.
Reference: Currency, Read-only
These are the totals for the Sales invoices included on this Receipt. These totals are calculated as the sum of all amounts shown in the respective Applied (Gross) , Discount / Retention and Applied (Nett) columns.
Reference: Button
This button displays the Sales invoice QuickList from which you can select one or multiple Sales invoices for the selected Customer. This has the same effect as pressing the QuickList Hot Key while in the Invoice number field.
Invoices are returned and placed in the Receipt lines in the order they appeared in the Invoice quick list. This is important to note as when Invoices are selected, value is allocated to the Invoices in the order they are returned, up to the specified receipt amount. One exception to this rule is that the full value is always allocated to any Invoice with an amount owing less than $0, regardless of the order the Invoices were returned in.
Reference: Read-only
This section appears only in Idle mode and only on Receipts that have a settlement discount applied for one or more Sales invoices.
When a settlement discount is applied for an Invoice on a Receipt, the Applied (Gross) value is allocated to the invoice, but only the Applied (Nett) value is actually received from the Customer. To balance these amounts, a new Invoice is created for the difference and linked to the current receipt as a settlement discount Invoice. Brief details of this Invoice are then displayed in the Settlement discount values section.
Each time a Receipt with a linked Settlement discount Invoice is modified, the Settlement discount Invoice is recreated to reflect the changes.
Deleting a Receipt with a linked Settlement discount Invoice will also cause the Settlement discount Invoice to be removed.
Reference: Button
Information is under review for a new version and will be updated soon.
Reference: Read-only
Information is under review for a new version and will be updated soon.
Sometimes you receive money and allocate it to the wrong Customer’s account, and even the wrong Sales invoice!
Process – if you have not locked your periods and not sent out statements
- Delete the original Receipt and re-enter against the correct customer
Process – if you have locked your periods or the details of the receipt has otherwise been recorded somewhere
- Enter a negative receipt against the same customer code as the original (wrong) receipt
- Allocate a negative amount to the same invoice (which will deallocate payment)
- Post the receipt to a clearing account, not the bank account (the Receipt into account)
- Now do a new receipt for the correct customer
- Change the Receipt into account to the same clearing account used in step 1. (The balance in the clearing account should now be $0)


