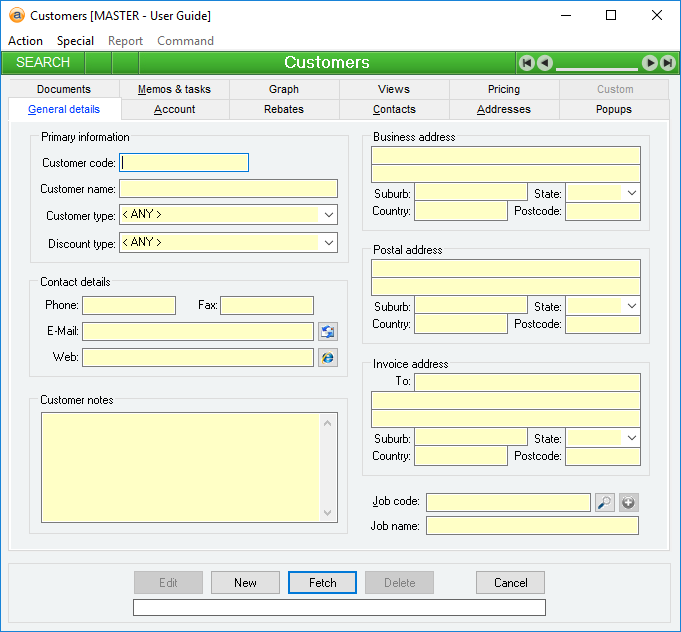
Customer
Customers are generally entities to whom you sell goods and services and who will, at some time, owe you money for these goods or services.
Every new Customer that is created is assigned a unique Accounts in the Accounts system, and all monetary transactions with the Customer occur within this account. The Current balance of a Customer’s account is the amount owed to you by that Customer. You cannot delete a Customer if their account cannot also be deleted for accounting reasons.
A Customer is referenced throughout the system by their Customer code.
- Customer codes are FlexiCode
- Multiple delivery address specifications
- Separate General ledger account for each Customer
- Multiple contact details for Admin, Sales and Accounts departments
- Unlimited date-stamped memo entries available per Customer
- Supports Pending delete status
Module: Accounts receivable
Category: Customers
Activation: Main > Accounts receivable > Customers
Form style: Multiple instance, WYSIWYS, SODA
Special actions available for users with Administrator permissions:
- Edit the following restricted fields:
- Customer code
- Customer name
- Customer type
- Discount type
- Customer notes
- Head office account: Customer code
- All fields on the Account tab (the Receipt money to account field is not a restricted field)
- All fields on the Rebates tab
- Shipping company account numbers
- View and edit deleted customers with the Allow display of deleted records menu option.
- Change the User ID of the Entered by field of memos.
- Edit memos entered by other users.
Special note - If a user does not have administrator permissions on the customers function, they will only be able to perform limited changes to the customer details. These administrator-only permission restrictions only apply when editing an existing Customer, not while creating a new Customer record.
Available fields:
- General tab > Contact details, Address details, Job code
- Accounts tab > Receipt money to account
- Addresses tab > Delivery instructions, adding/editing existing addresses
- Shipping company account numbers are not available
Database rules:
- A Customer cannot be deleted if it is referenced by either its Customer code or its Customer name by any of the following:
References: Text(12), Mandatory, FlexiCode, WYSIWYS
This is the code that is used to identify this customer on most forms throughout the Accounts receivable system. The code used here should be long enough to make it unique across all customers, but short enough to make it convenient to use as a quick identifier for a customer.
You can use any text you like or even a number to represent your customers. Whenever you are expected to select a customer on a form (for example, Sales order), it is the Customer code that you will be required to enter.
The Customer code is a FlexiCode. This allows you to modify the Customer code while still retaining all previous internal references and links to that customer.
Some characters may cause issues when exporting files. Windows standard illegal file-name characters \:/*?'<>| will be converted automatically to underscores "_" on export if such characters exist in the code.
References: Select from list, Mandatory, HotEdit, WYSIWYS
This is a classification used to arbitrarily group the customer in a way other than for Pricing tab arrangements. This grouping is used purely as a searching and reporting mechanism, and so that you can classify your customers into various groups as necessary that are not based on their Discount structure. For example, you may have Local and Export customers, or you may have Normal or Distributor customers. You would not generally have Trade and Retail as Customer types – they would be classified as Discount types.
The Customer type is not used in determining how a customer’s discounts are calculated or any other Pricing tab determinations. This is the important distinction between the Customer type and the Discount type of a customer.
References: Mandatory, HotEdit, WYSIWYS
This is a classification used to group the customer based on their discount or pricing arrangements. The Discount structure facility is able to use a customer’s Discount type in the final determination of a price for an item.
A customer’s Customer type is not used in determining how a customer’s discounts are calculated or any other Pricing tab determinations. This is the important distinction between the Discount type and the Customer type.
References: Memo, Expandable, WYSIWYS
This field allows you to make notes or other reference information about the customer.
This is the business (physical) address of the customer for purposes other than deliveries. If you do not have any Delivery address specified for the customer, the business address will be used as the default delivery address in Sales quotations, Sales orders and Sales invoices.
This is the default Invoice address used in Sales quotations, Sales orders and Sales invoices. This address will only be used as a default if there is no Invoice address specified in the Addresses tab for the customer.
References: Text(64), QuickList, WYSIWYS
This is the code of the Jobs that will be used by default whenever a Sales quotation, Sales order and Sales invoice is entered for the customer. Regardless of whether or not you specify a job for the customer, you can always modify the job at the Sales quotation, Sales order or Sales invoice stage if required.
When you enter a job code, the Job name is automatically filled with the name of the job you have entered.
 This button allows you to add a new job and then use that job on this form.
References: Text(12), QuickList, WYSIWYS
This is the Head office of this customer (branch), and represents another customer already defined within Accentis Enterprise.
Adding a Head office for a branch will mean that Statements created for the Head office will include the transactions and values for all branches.
This option indicates that goods for this customer are to be exported. This field is used for reporting purposes only.
When this option is ticked, the This customer is exempt from GST field also becomes ticked, but is not prevented from being unticked.
This option determines whether the customer holds a GST exemption status. When enabled, no GST will be included for the customer on Sales quotations, Sales orders and Sales invoices.
This specifies that the customer is an inter-branch customer. This allows the isolation of interbranch sales from your normal profit and loss accounts by affecting which General ledger Accounts are used during Dispatch and Sales invoice transactions for the customer as follows:
- Dispatches: Any item dispatched to an Interbranch customer uses the Interbranch customer Cost of sales account specified in the System preferences instead of the normal Cost of Sales account for that item.
- Sales Invoices: Any item invoiced to an Interbranch customer uses the Interbranch customer Income account specified in the System preferences instead of the normal Income account for that item.
This option determines whether or not the customer will appear in the list of selectable customers on the Customer statements form.
This option will not affect the Head office / branch relationship when printing statements.
References: Select from list, WYSIWYS
This set of options is used to determine how customers prefer to receive any customer based reports generated from Accentis Enterprise.
The available options are
- Fax
- E-Mail.
Regardless of the selected method, you will always have the option to change the reporting method at the time each report is generated.
If an Output method has not been set in the Report manager (i.e. <not specified>), and the report is produced for a customer, then this is the reporting method that will be used.
Last edit 18/09/19
Reference: Select from list, WYSIWYS
This is the Warehouse that is used by default when you create new records for a Sales quotation, Sales invoice or Sales order using this customer. This is not mandatory, and it can often be easier to leave this field blank unless it is required.
This field can be useful when you have a customer that is always associated with a specific warehouse, such as inter-state branches.
If this field is utilised, you should always check your Sales quotations, invoices, and orders to ensure that the default warehouse matches the warehouse from which you intend to deliver the stock.
This option overrides the Accounts Receivable System preference Default sales warehouse.
This option will be overridden by the PC Defaults System preferences Default sales warehouse and Default POS warehouse.
Last edit 06/09/19
References: Account Field Type, QuickList, WYSIWYS
This field allows the entry of a GL account which will be used when receipting money for this customer. Once specified, this account will override the Default bank account and Default account for receipt of cheques / cash in the system preferences and be used by default as the Receive into account… on all new receipts for the customer.
References: Text(12), Mandatory, WYSIWYS
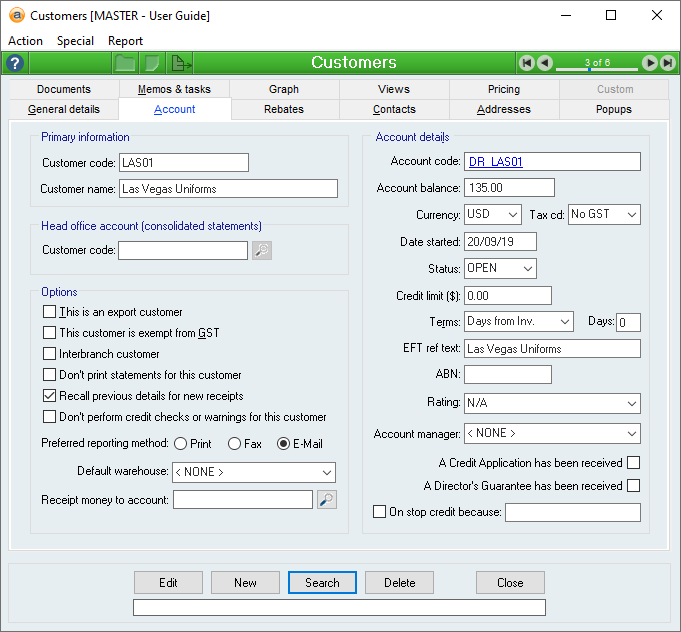
This is the Account code that identifies the account that is used exclusively by this customer. When you first create a customer, you will create a unique Customer code, and a General ledger Accounts will be created using this code and a prefix of DR_, e.g., DR_CUS001.
Once a customer has been created, their respective account is linked to that customer for the life of the customer, and can only be removed by deleting the customer record.
Editing this field will also edit the Account code for the linked account.
Deleting a Customer record will also delete the linked account. If the customer’s account is unable to be deleted for accounting reasons (such as residual balance), the Customer record cannot be deleted.
References: Currency, Read-only
This is the Current balance of the customer’s account. In general terms, this balance is the amount currently owed to you by this customer. For more extensive information about the account, search for the customer’s Account code in the Accounts form .
References: Select from list, Mandatory, HotEdit, WYSIWYS
This is the Currency that will be used when dealing with the customer. The account created for the customer will be created with this currency type.
Reference: Select from list, WYSIWYS
This is the customer's Tax codes that will be used on all Sales quotations, Sales orders and Sales invoices.
By default, lines on Sales quotes, orders, and invoices will use the tax code that has been allocated to the Item. Specifying a tax code using this field will pre-fill the tax code for each new line, and will override the tax code set for any existing line on that record. However, tax codes for each line can still be altered and can differ from the record-specific tax code if desired.
You may choose to use this for organisations that have region-based tax regimes (e.g. United States), and need a tax code / jurisdiction to default per customer. You would also use this for customers who are always tax exempt, or need to be set to a special tax code for any other reason. You can use keyboard shortcut F12 to manage this field.
If you don't need to use this for any specific reason, it's best to leave it empty and let the system enter the default values. Incorrect use can cause undesired effects, so only use it if you are sure you understand what its effects will be.
This field will only appear when Allow tax codes to be set on Customers and Sales records has been set in system preferences.
Last edit 26/02/24
References: Date, Mandatory, QuickList, WYSIWYS
This is the date you accepted a trading arrangement with this customer. This would usually be the same date as that which appears as the acceptance date on the customer’s first credit application. It is used only as a reference and has no effect on other parts of the Accounts receivable system.
References: Select from list, Mandatory, WYSIWYS
This is the current status of the customer's account.
A customer's account can be either "Open" or "Closed". Once a customer's account has been set as Closed, the customer cannot be used.
References: Currency, Credit limit
This is the limit of credit available to the customer, and is used as a check against the Current balance of their account when processing Sales documents.
When a Sales quotation or Sales order is created for a customer, the user will be warned if the customer is currently over their credit limit.
A Dispatch or Sales invoice cannot be updated for a customer if the amount of the dispatch or invoice will place that customer over their credit limit, unless the current user has Administrator permissions in which case they can override this check.
If the Credit limit field is left empty, then no credit-limit checks are made against the customer. If the field is set to zero, then the customer has no credit available to them.
References: Number, Select from list
These are the Credit terms that will be applied to the customer and indicate the time frame the customer has before they have to repay an amount owing. For these Credit terms checks to occur and warn users, you must ensure that Perform credit terms checks has been selected in the Accounts receivable System preferences. You must also ensure that Don’t perform any credit checks when dispatching is NOT selected if you would like the Credit terms check to occur on a Dispatch.
The Credit terms section consists of two fields; a drop-down list from which you can select terms, and a number field in which you can input a value of days/months.
The Credit terms can be specified in one of the following terms:
This is Cash on Delivery, which means you will receive payment for the goods once they are delivered.
- It will warn when dispatching, POS invoicing or Invoicing manual lines.
- It will not warn on Sales orders.
This option allows you to specify a number of days from the End of Month by which the customer must repay an amount owing.
This option allows you to specify a number of days from the date of Invoice by which the customer must repay an amount owing.
This option allows you to specify a number of months from the End of Month by which the customer must repay an amount owing.
This option allows you to specify a number of months from the date of Invoice by which the customer must repay an amount owing.
This option means you want the customer to prepay for the goods before they are dispatched.
- It will warn when updating or creating a Dispatch, POS invoice, or Invoicing manual lines.
- It will stop users updating if they do not have Administrator permissions to override the warning.
- It will not produce any errors if the System preferences have not been configured to Perform credit terms checks.
- It will not produce an error when updating a Dispatch if Don’t perform any credit checks when dispatching has been selected within System preferences.
- It will not warn on Sales Orders.
If Days from EOM or Days from Inv. have been selected from the drop-down list, an additional value field will be displayed to allow you to input a number of days to be used in the calculation of the Credit terms.
If Months from EOM or Months from Inv. have been selected from the drop-down list, an additional value field will be displayed to allow you to input a number of months to be used in the calculation of the Credit terms.
A customer can be automatically placed on stop-credit by the Accentis server if they are over their credit terms on a Sales invoice.
If the current user has Administrator permissions, they will be able to override the Credit terms check.
Last edit: 04/09/23
This field provides a way for you to record the preferred Text you wish the customer to use as a reference on any payments. This field is used as part of the Auto-match functionality provided in the Account Reconciliation form.
References: Number
This is the Australian Business Number for the customer. While it is not compulsory for you to know this, if it is entered it must be a valid ABN.
References: Select from list, Mandatory
This is a credit rating applied to the customer. While only used for reference purposes, it can be an aid to determining their Credit limit or Terms, or a quick reference for accounts staff when determining a temporary credit extension on overdue amounts.
References: Select from list, HotEdit, WYSIWYS
This is the Accentis Enterprise user assigned as the manager for dealings with this customer. If an account manager is specified for a customer, that user will be automatically set by default as Our contact for each new Sales quotation and Sales order entered for the customer.
References: Yes/no, WYSIWYS, Stop-credit
This determines whether or not a customer is on stop-credit. If a customer is on stop-credit then only users with Administrator permissions are able to create a Dispatch or Sales invoice for that customer. Furthermore, any user who tries to create or update a Sales order for a customer on stop-credit is warned of this fact.
This is the reason why the customer is on stop-credit. The text you enter here appears in the warning boxes displayed when a user attempts to update a Sales order, Dispatch or Sales invoice for this customer.
References: Select from list, HotEdit, WYSIWYS
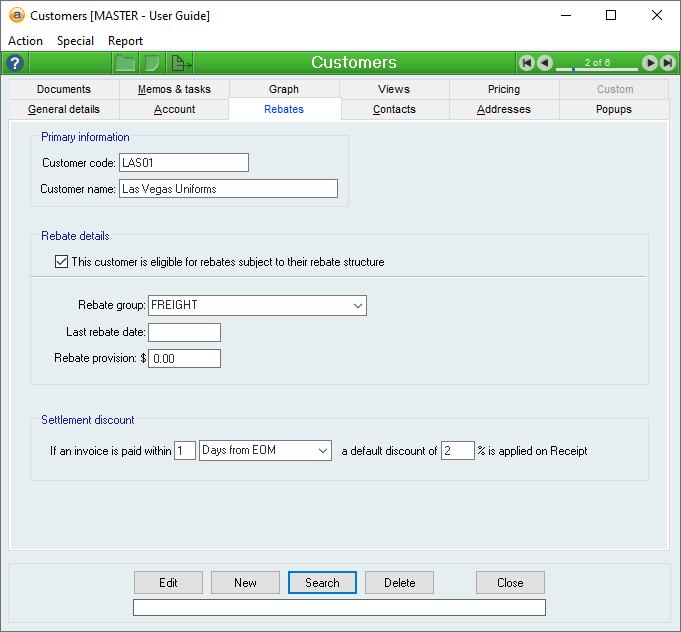
This field allows you to assign a Rebate group to the customer. Once a Rebate group has been assigned to a customer, all rebates associated with that Rebate group will be applied to any sales for the customer.
References: Date, QuickList, WYSIWYS
This is the last date a rebate was processed for this customer. For customers who have Rebate structure entries that are calculated periodically (e.g. monthly or yearly, as opposed to being added to each Sales invoice or order), this date allows Accentis Enterprise to determine the date from which to calculate the next periodic rebate. When you first add rebate information for customers, you should set this date to be the date immediately prior to the customer’s rebate starting period.
When rebates are automatically calculated for this customer (using Accounts receivable > Process rebates), the Last rebate date is automatically filled in for each customer for whom a rebate was just calculated. This means you will not need to manually keep the date updated unless you want to skip a period of rebates.
References: Currency, Read-only
The rebate provision is a current tally of the value of rebates due to be paid to a customer but for which a rebate credit invoice has not yet been generated. When you process periodic rebates for customers, you have an option to generate a rebate provision, but you don’t have to immediately generate the actual rebate credit. Once the rebate credit invoice is generated, this provision amount is reset back to $0.
References: Number, Select from list
This includes the time frame which the Customer has to pay a Sales invoice in order to qualify for a discount on the Invoice price.
This option includes three fields into which details can be specified, and is structured as follows:
"If an invoice is paid within [number] [unit] a default discount of [percent] % is applied on Receipt".
References: Number (12)
This is the number of days/months used in the calculation of the discount.
References: Select from list
This is the unit to be used in the calculation of the discount. This field is a drop-down list from which one of the following options can be selected:
References: Number (5)
This is the percent of the total value on the Receipt that will be discounted if the customer pays the invoice within the specified time frame.
This discount can be overridden at the Receipt stage if desired.

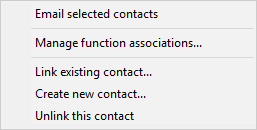
The Contacts tab lists all Contact Manager records that have been linked to this customer. A contact can only be linked to the customer once, but a contact can be linked to any number of other customers. You are able to link, unlink, create a new contact or delete a contact using the buttons at the bottom. You can also right click in an empty area of the list to link or add a new contact.
You are able to select multiple contact records to make changes in bulk. To multi-select contacts outside of a range, press and hold Ctrl on your keyboard and use the mouse to select as many contacts as you want. To select multiple contacts within a range, select your first contact using your mouse, press and hold Shift on your keyboard and use the mouse to select the last contact in the range.
When multiple contacts are selected, the unlink, delete and email buttons will apply to all of them. In the case of email, it will fill in the To field.
You can also right click on the Contacts list to perform special actions:
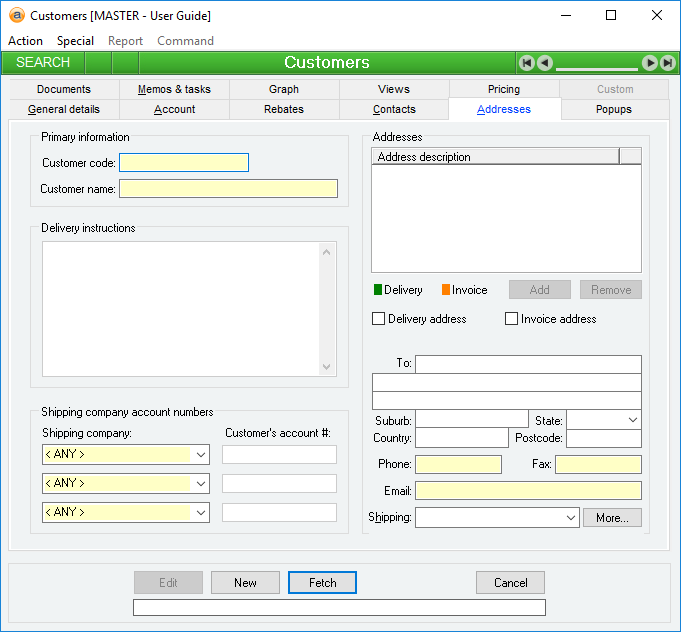
The Addresses tab on the Customer record allows recording of additional addresses and shipping details for the customer. Adding additional addresses can be used for a variety of purposes and are very powerful, and can be used for invoice addresses, delivery addresses and branch address for contacts.
The addresses tab also includes delivery address shipping information for the customer.
References: Memo, Expandable
This field contains free-format instructions or details relating to the delivery of goods.
Reference: Select from list, Number
This setting allows you to configure three different sets of Shipping codes. This is used when you want to ensure that a delivery using a specific Shipping company is to be billed to the customer.
Each set of Shipping company account numbers consists of two fields:
Reference: Select from list
This is a drop-down list from which you can select a Shipping codes referring to a specific shipping company.
This field can be managed by pressing F12.
Reference: Number
This is a number field that allows you to input the customer's account number with the Shipping company. This field does not refer to an Accentis Enterprise code, but rather the customer's account number which can be billed by the shipping company delivering the goods.
If a Customer account # has been specified for a Shipping company, when that Shipping is selected on a Sales order for the customer, the Account # field will pre-fill with the specified Customer account #. This will mean that the Account # will be printed on the Consignment Note and will be utilised by the Shipping company as the account to be billed for the delivery.
This section manages all of the possible delivery and invoice addresses that have been assigned to this customer for use in Sales quotations, Sales orders and Sales invoices. Whenever a Sales quotation, Sales order or Sales invoice is created for a customer, you have an opportunity to select from these predefined addresses.
References: List
Addresses specified in the list can be set as a Default Delivery / Invoice address (indicated by a white dot next to the address). Addresses marked as the default address will automatically be selected for a new Sales quotation, Sales order or Sales invoice.
To add a new address to the list, either right-click on the list and select Add new address from the pop-up menu, or click on the Add button below the list box. By right-clicking on an existing address you are able to Edit or Delete the address, or assign it as the default address.
References: Button
This button allows you to add an additional address to the Address list.
References: Button
This button will remove the selected address from the Address list.
References: Yes/no
This option allows you to specify whether the selected address is a Delivery address. When this option has been selected, a green rectangle will be displayed in front of the address in the Address list, like this:

Addresses can be flagged as both Delivery and Invoice addresses, in which case they will be displayed like this:

Last edit 28/02/24
References: Yes/no
This option allows you to specify whether the selected address is an Invoice address. When this option has been selected, an orange rectangle will be displayed in front of the address in the Address list, like this:

Addresses can be flagged as both Delivery and Invoice addresses, in which case they will be displayed like this:
Last edit 28/02/24
This is where you will input the address details. This section consists of three address lines, as well as Suburb, State, Country, and Post code fields. The first address line will pre-fill with the Customer name for you.
These fields have no relation to the Customer's Business address, Postal address, or Invoice address as listed on the General details tab of the form.
Last edit 28/02/24
References: Select from list, HotEdit
This is the preferred shipping method that is linked to the current delivery address selected in the Delivery Address list. Whenever the selected delivery address is selected in the Address field on a Sales order, the Sales order Shipping field will be filled in automatically with the shipping method specified here (however, it can be changed manually).
Reference: Button

Pressing this button displays the Additional delivery information form which allows you to input extra information about any delivery made when this address is selected in a Sales quotation, Sales order or Sales invoice. It can include additional delivery notes that are unique to this address and an Account # for the customer. Depending on your reports configurations, they can appear on delivery dockets and sales order confirmations.
The additional information can be used to specify particular delivery details. This information can be important for delivery contractors who may not have delivered to this location before, or something about the address has changed, such as new delivery terms.
This form consists of two read-only fields displaying the Customer name and Address, and two fields into which additional delivery information can be input.
Reference: Text
This field is a free-format text box which allows you to detail any notes relevant to the delivery.
Reference: Number
This field allows you to input the customer's account number relating to the selected shipping company. This is used when you want to ensure that the delivery is billed to the customer.
This field will pre-fill with the Customer account # specified in the Shipping company account numbers section of the customer form if one has been specified for the selected Shipping company. This field can be edited if required.
References: Memo
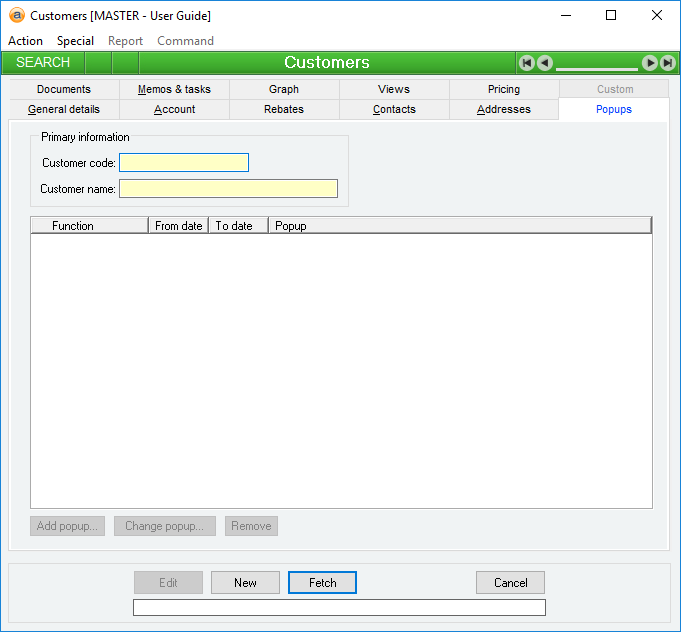
This section contains a list of forms that can have text associated as a reminder that will pop-up in front of the user whenever this customer is added to the respective form. The text here is designed to be an important reminder to the user who is creating / editing a record that is using one of these customers.
Pop up notifications are available for the following forms:
References: Select from list, Read-only
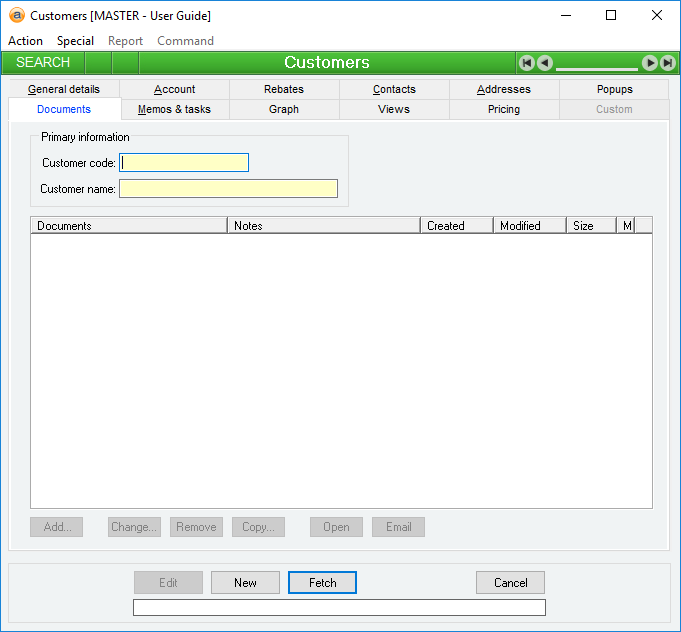
This is a list of all relevant data files associated with the customer. They can be data specification documents, marketing material, purchasing documents or any other document that is appropriate.
The document list is a list of files names and associated files. You can specify any type of file that you like, even image or multimedia files.
In Idle mode, if you double-click on one of the list items, the associated document will be opened by Windows providing an appropriate file association exists.
You can Add, Edit or Delete the list of data files by using the buttons at the bottom of the list. There is no practical limit to the number of data files you can specify for an asset.
If you do not specify a full pathname for the filename of a data file, the default data file directory found in the Database Setup will be used.
For more information, please see Accentis Document Management.
It is possible to drag /drop multiple documents from a list as well as use the Remove, Copy and Email buttons. When multiple documents are selected, the Change and Open buttons are disabled as these options are only related to individual documents
Last edit: 28/02/24
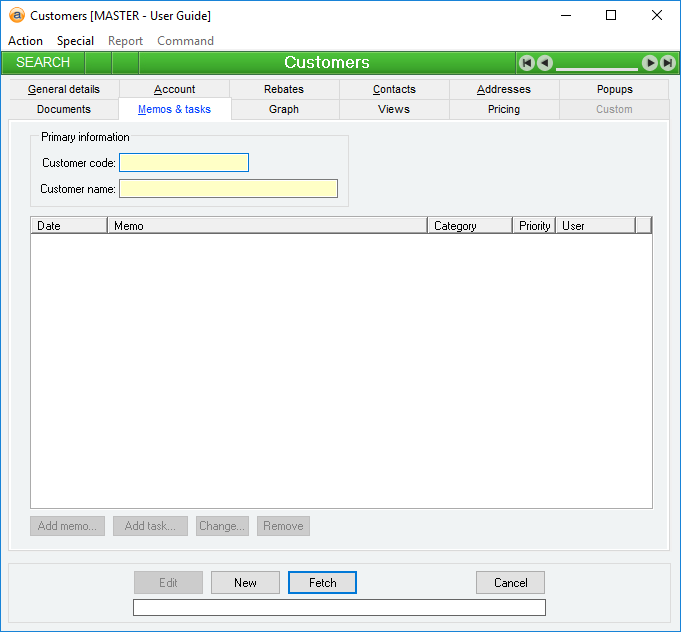
The Customer memo section allows you to enter an unlimited number of memos to record historical events and facts about the customer. This is particularly useful for recording payment history for bad payers or a change of business name.
To add a new memo, click on the Add memo button to display a form that will allow you to enter the date, the user and the memo Text.
To edit an existing memo, either click on the Edit memo button or double-click on the list entry.
To delete a memo, click on the Delete memo button.
Memos cannot be edited unless the Customer form is in Edit mode.
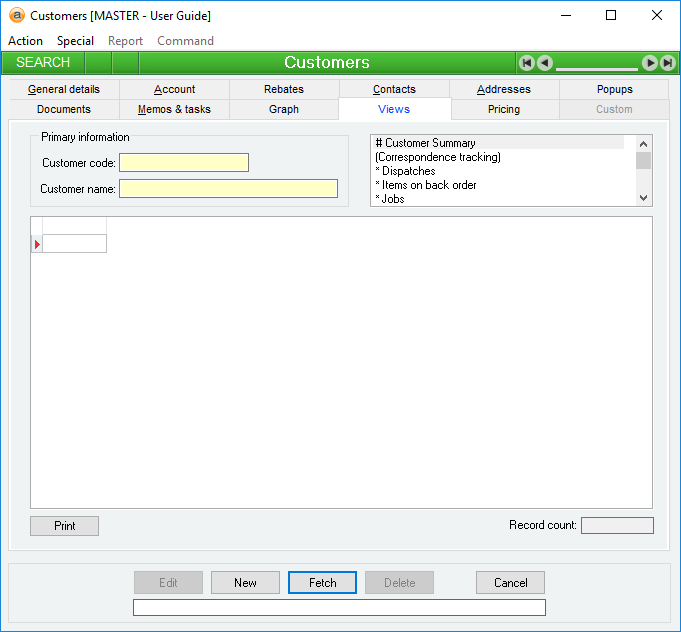
The Views tab on the Customer record provides a set of built-in reports that can be viewed just for that customer. The reports operate in many ways exactly the same as other searches (i.e. you can move columns, highlight, hyperlink, order data, etc.). The set of views for a customer is configurable: you may request that any other reports be added to this list, providing that the report doesn’t require additional filters (you will see that the views don’t accept any filters, just the customer code).
If you would like additional reports/lists added to customer views, contact Accentis Support.
References: Select from list, Read-only
This tab shows instant reports for this customer. The VIEWS can be customised by the Accentis Support team so if you would like more reports in this section, please contact Accentis Support.
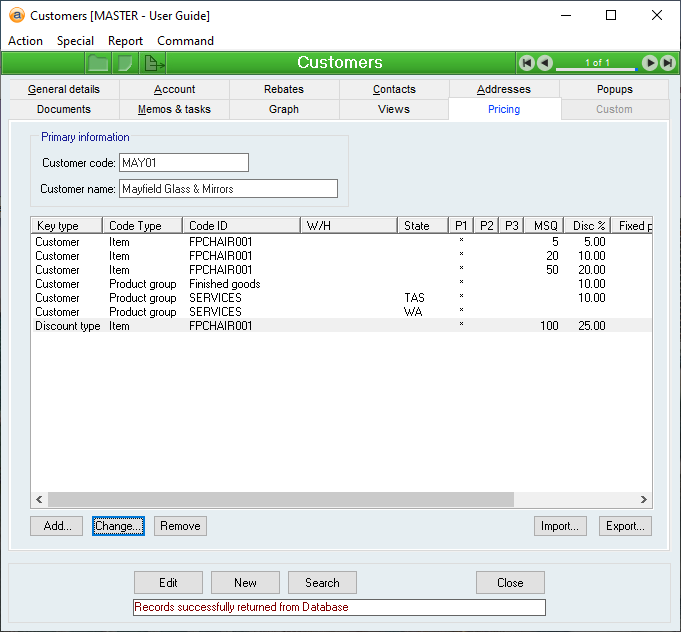
The Pricing tab displays entries from your Discount structures that relate to this customer or to the discount type attached to this customer. It is designed to display any specific item list price overrides for the customer — not a complete price list of all inventory.
New rules can be added, changed or removed using the buttons at the bottom of the Pricing tab.
If you attempt to change or delete a rule that applies to a group of customers (i.e. a discount type), you will be warned that your changes will affect more than just this customer.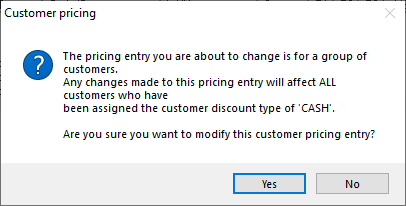
When you add a new entry, it will be locked to either this customer or this customer’s discount type. If you want to add discount entries that don’t apply to this customer, use the Discount structure function directly.
When adding or modifying entries in this section, changing the Key type field (see Discount structure) between Customer or Discount type will cause the current Customer code or the Discount type for the current customer to be automatically filled in. This code cannot then be changed.
References: Button field
This button allows you to import entries on a CSV file. The input file is the same format as the export file using the Export... button, so it is best to export first, make any modifications, and then import.
References: Button field
This button allows you to export the entries shown in the list to a CSV file. You can then modify and re-import the entries using the same format file.
References: Menu
This action will launch the Sales enquiry form in Add mode to create a new record and pre-fill the Customer code.
References: Menu
This action will launch the Sales quotation form in Add mode to create a new record and pre-fill the Customer code.
References: Menu
This action will launch the Sales order form in Add mode to create a new record and pre-fill the Customer code.
References: Menu
This action will launch the Returned goods form in Add mode to create a new record and pre-fill the Customer code.
References: Menu
This action will launch the Sales invoice form in Add mode to create a new record and pre-fill the Customer code.
References: Menu
This action will launch the Sales invoice form in POS mode and Add mode to create a new record and pre-fill the Customer code.
References: Menu
This action will launch the Receipt form in Add mode to create a new record and pre-fill the Customer code.
Reference: Menu
If set, this will display records that have been set as “Pending delete”. This means that a user has deleted them, but because they are linked to other data and historical records, they are not able to be properly deleted and are put into a “recycle bin”. Under normal circumstances you won’t see these records but the option to “Allow display of deleted records” will make them appear while this window is open. If you close the window, and reopen it, you will need to select the “Allow display of deleted records” option if you wish to see the pending-deleted records again.
Note: Once a record has been permanently deleted (that is, there are no linked records and the data has actually been removed), this option will not show those records.
See Pending delete for more information.
Last edit 10/01/22